
"What this country needs is dirtier
fingernails and cleaner minds."
Will Rodgers
World War II Garden Poster
Soil and Compost: Good gardens start with good soil.
I was fortunate enough to start out with relatively good soil. I did
not want or need to use raised beds, although they are certainly worth the
initial time and effort to construct. I realize that some people have
no choice but to use raised beds, if their soil is REALLY bad or there
is poor drainage, but I like the natural look. Even really bad soil
can be improved, over time, with soil amendments. I do have of a
small Mantis tiller which helped to initially break up the hard
ground. If you are starting out with raised beds, use the soil formula
in Mel's book. Since I was amending the existing soil, I started out
working into the soil generous amounts of peat moss, composted cow manure,
and some vermiculite. The following are the amendments I add throughout
the growing season: In the early spring, I spread a layer of compost
over the garden plots. During the growing season, I use grass clippings
for mulch. At the end of the growing season, I add about a one inch
layer of shredded tree leaves
over each garden plot. Over the
winter, these leaves will compost down and decay, which can either be tilled under
in the spring or kept on the surface for
mulch. Weather permitting, I like to till up the soil in either the
fall, before the leaves are added, or in the spring. For me,
spring tilling always seems problematic due to wet soil conditions.
Because I have been composting the plots for a few years now, the need to
till has decreased. I have two compost bins that supply nearly all the
compost I need every year. I cannot stress enough the importance of
using compost in your garden.
Irrigation and Varmint Control: Some kind of artificial
watering will have to be done, in most growing seasons, if you want a good
harvest. I use soaker hoses made out of recycled tires. It is porous and
weeps water throughout the entire length of the hose. I snake it through my
plots and also bury it about an inch deep into the soil. Smaller lengths
of hose work best for more even watering. I find that two 25 foot lengths
of soaker hose works best in each garden plot. I only use the soaker
hoses in the two plots that contain the green beans and the broccoli/cabbage.
I hand water the other two plots, when needed.
A few years ago my garden was visited by some hungry rabbits. They
chewed down all of my young transplants and had a field day in my green bean
patch. Because of this, I had to fence in three of the four garden
plots. I have surrounded these plots with 3 foot high galvanized
fencing for a few years now, and have not had any problems with rabbits
since.
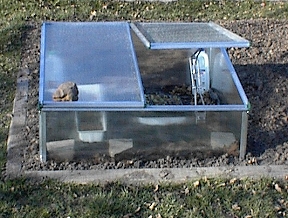
In 2007 I installed an electric fence around the
raised bed corn plot to keep the squirrels out. It worked really
well. The fence is battery operated and sends out a pulsated electric
shock. While the shock is an effective deterrent, it is completely
safe for animals and humans, and is approved for residential use.
The electric fence charger is from Fi-Shock. You will need to install a small
barrier fence (any small plastic mesh fencing would work), which is not included
in the kit, to place between the electrified wires and the inside of the raised
bed. This insures that the squirrel will come in contact with the electrified
wire and not just jump over it. Two rows of electric wires should be
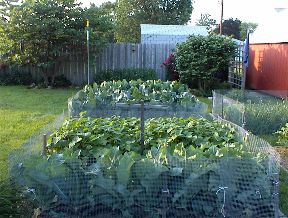
installed just above the top of the raised bed. See below for pictures of
the installed electric fence. The first picture below is the electric
fence before the barrier fence was installed. The second pic is with the
barrier fence installed. If you are having trouble with squirrels or any
small animals, for that matter, then this fence should work for you.
Seed Starting: Starting your own plants from
seed is one of the most rewarding aspects of gardening. It allows the
gardening greater plant variety, and is less expensive than buying
transplants. Since most of my garden plants are not directly seed sown
out into the garden, I must either start my seeds indoors under florescent
lights or in an outside cold frame. I tried starting my seed indoors
under lights, but was not satisfied with the quality of the seedlings.
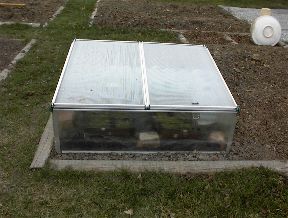
I decided to purchase a cold frame. I purchased a Juwel cold frame and it has
performed very well. I also purchased an automatic opener with the
cold frame (this is a must), which keeps the seedlings from overheating. I place the cold frame
over an empty part of the garden in the spring and line the bottom with used
black trash bags. I also line the back and sides of the cold frame
with half gallon plastic milk jugs filled with water and place a few bricks
inside. These bricks and jugs of water absorb the heat from the sun during the day and slowly
release
it at night. I use the Juwel cold frame in the spring and then take it
apart and store it away until the following spring. I start all
my seeds in individual plastic seed trays. I sow the seeds inside and
wait until the seeds germinate and then move them to the cold frame. I
start all my seeds in vermiculite. I keep most seedlings in the small
cells that they were started in until they are transplanted out into the
garden. I always bottom water the seedlings and feed them a dilute
mixture of Neptune's Harvest fish and seaweed fertilizer, when the seedlings have their first set of true leaves. The
seedlings in the cold frame must be checked at least daily and watered whenever the vermiculite is dry. Once seedlings reach a large enough size,
they should be allowed to dry out a little between waterings. I have
found that no hardening off period is needed for the seedlings raised in the
cold frame, which is a big time saver. After the last spring frost the
cold frame is put away for the season, but I continue to start
lettuce, broccoli and cauliflower seeds outside under the covered back porch
awning.

Fertilizers and Insect Control: I do make use
of some supplemental fertilizers, all organic. I prefer to make most
of my own organic
fertilizers, but organic fertilizer
can also be purchased. Since I have chickens, I also add chicken manure to
my compost bins throughout the year and I also directly apply some chicken
manure on my garden beds in the fall and early winter. Chicken manure
makes the best fertilizer!!
I also use a fish and seaweed fertilizer from Neptune Harvest. This is the only extra fertilizer I use on my
lettuce. I
have been very impressed with the results. For control of worms on cabbage, broccoli, cauliflower, etc. I recommend any product that contains
the active ingredient "bt" (Bacillus Thuringiensis) or Spinosad.
Both of these are considered a bio insecticide (and classified organic) and are quite effective at controlling the imported cabbage worms and cabbage loopers that feed on the leaves of plants in the brassica (cabbage) family.
The only non organic pesticide I use is Sevin, which I use on
my green beans for control of the beetles. I apply Sevin in small
amounts and only when needed during the growing season.
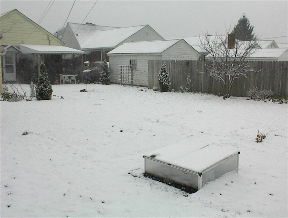
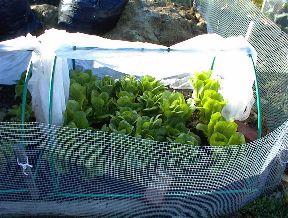
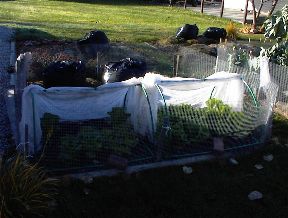
Extending the Garden Season and Fall Gardening: The absolute best
product I have found to aid in extending the growing season is the floating
row cover. These cover are made from soft polypropylene fibers which allow
light and moisture in, while protecting crops from frost and cold
temperatures. Supports are not needed for these covers and can simply be placed over the
plants and secured to the ground with pins or bricks. I use row covers in the spring, to protect early plantings of
lettuce, and in the fall for protection of many late maturing
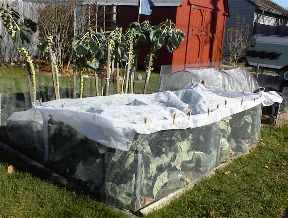
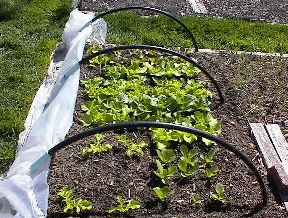
garden plants. I have also purchased flexible plastic "hoop houses" that
can be used in conjunction with the row covers for even extra
protection. I like to use these in the fall. I also apply shade
netting to these hoops for summer protection of newly planted lettuce
seedlings.
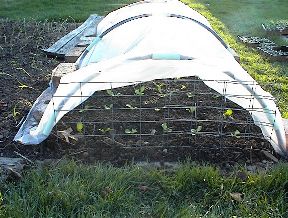
Starting in the 2003 growing season, I constructed a hoop house made out of
1/2 inch black polypipe with the use of "Garden Clips." I
was very impressed with how well the plants grew under these hoop
houses. for the covering, I used cheap plastic from one of the home
improvement centers. This plastic worked very well, and can be thrown
out after one season of use. If you only need to enclose a small area
like mine, you will probably only need to order the medium size clips.
10 medium clips were enough for me to make two of the smaller hoop
houses. These Garden Clips will come with a nice 4 page instruction
and design manual which list all the material you will need to construct
your own hoop house. I highly recommend using hoop houses and these
clips. The only drawback I found in using these hoop was making sure they
were properly vented on warm days. I generally kept the ends
completely open during the early spring, unless the weather was really cold
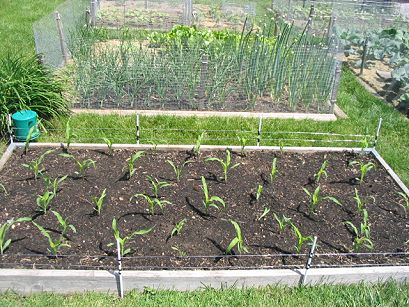
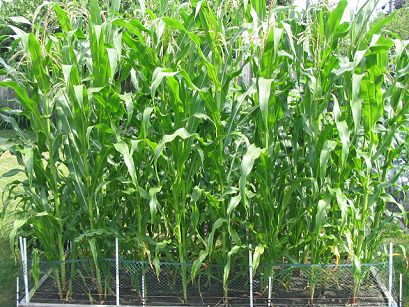
and cloudy. The garden clips and hoop house can been seen in the last
two pictures below.
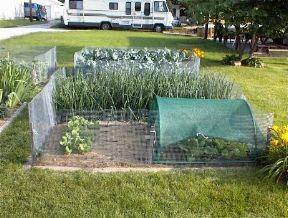
See below for pictures of all of these products in use in
my garden.
By the time August and September roll around, most gardeners are tired of
gardening and have long since planted their last crops. This is a
shame, because fall is the best time of the year for many vegetable
crops. Most of your cool season crops will actually grow better in the
fall, and a few of your warmer season crops will also grow well in the late
summer and early fall time of the year. A late summer planting of bush
green beans will actually mature faster than a late spring planting because
the soils are warmer and the air temperatures are warm, but not hot.
Crops like broccoli, cabbage, and cauliflower will grow better because they
will be maturing in the progressively cooler temperatures of fall rather
than the progressively warmer temperatures of early summer. Lettuce
will also grow much better because of these cooler temperature and will not
bolt or turn bitter like what tends to happen to some of the late spring
planted lettuce. A fall planted crop of lettuce will have an extended
harvest period because all growth will slow down or nearly stop.
Providing the plants are covered with floating row covers, most cool crops
should keep reasonably well for an extended period of time until the nighttime
temperatures consistently drop below 20 degrees Fahrenheit.
Experiment and Have Fun!: Do not be afraid to experiment with new techniques and new plants. Also remember, what might work for some gardeners, might not always work for you or your situation. The number one tip I can give you is to have fun!!
![]()
All Content © Copyright 2002-2020 Tim's Square Foot Gardening